Monday, 29 December 2014

Keeping track of battery chargers

Like every household we have several battery chargers, looking similar but not exactly the same.  This can be irritating if my husband and I grab the wrong charger. Keeping track of 'His' and 'Hers' chargers is a nuisance so  at the weekend I decided to make 2 drawstring bags using Pink Penguin's excellent tutorial.

The tutorial is straightforward to follow, especially as she has lots of photographs showing each stage very clearly.  I made them in different colourways, a more girly one with pinks for me and a more masculine one ( black, green and blue) for my husband.

So now we should have no problem keeping our battery chargers safely. I think the bags will also be very useful when we go away as it should speed up the packing   Instead of hunting in drawers for various chargers, they will be together in their little bags ready to go!


They didn't take long to make especially as I used already cut 2.5" squares from my stash. I keep all my smaller pieces of fabric together so it only took a moment to find suitable fabric for the linings and casings. After I had cut the lining and casing pieces I had some scraps left over and I straightaway cut a few 2.5", 3" and 1.5" squares for my stash.
 
I keep pieces of ribbon too and I was able to find suitable lengths in my Ribbon Box and, of course buttons from my large Button stash!
 
Nothing is wasted in this house!  Bagged squares are much easier to store than irregular sized scraps which end up creased up and neglected.  I thoroughly recommend cutting up your scraps at the end of each project.  That way it's not a daunting task and your cut squares stash keeps growing.

Sunday, 28 December 2014

Another Crochet baby blanket finished

I have now finished a second crocheted baby blanket, this time using stronger "boy" colours.

I'm pleased with it. This one is a little larger than the first one I made as I think I had more links in the chain - 81 this time. I couldn't remember how many I had in the first one.  It's s nice size, measuring 25" x 31", and I like the colours I used.  A few of them are the same as I had in the first blanket but I didn't use the mauve and the pinks, adding a burgundy, a cream and a bright lime green to make it more suitable for a boy.

Here it is:


And a Close up of the stitches and stripe colours:


This blanket is waiting with the girly version to see which will be needed for the new baby expected any day now.

Tuesday, 23 December 2014

Hash Tags blocks for Sydney

I have just mailed 4 blocks for the wonderful project Molli Sparkles is running.  He is hoping to have enough blocks made so that he can make quilts for the families of victims in the Sydney Café Siege.


Click on sewing for Sydney to find out all the details.

The blocks are easy to make and don't take long to complete.

Here are mine, already winging their way to Australia:


Hope you can manage to make a couple of blocks too.

Wednesday, 17 December 2014

Granny Stripe crochet baby blanket

I haven't done any crochet for almost five years but I avidly follow Attic24's blog. I love Lucy's vibrant use of colour in everything she makes - it makes my mouth water.

One of my Patchwork friends Sarah is also an Attic24 follower and she took the plunge a while ago to make some stripey blankets, firstly based on Lucy's pattern and then on another idea she saw on the Little Woollie blog.  Sarah and I both love Lucy's Ripple Blanket and have desperately tried to follow the pattern, Sarah more successfully than me.  I was so disappointed - I really dislike things beating me!  Then Sarah suggested I tried the Granny Stripe pattern from Lucy's blog as she thought I would be able to manage that one.

So I have.  And I'm thrilled.  I decided to try a sensible size to start with and not throw myself in at the deep end with a full sized blanket.  I have had great pleasure in making a baby sized blanket.  With the edging it measures 22" x 27" which will be a nice size for a new baby.  One of our cousin's daughters is expecting a baby on New Year's Day so if Helen has a girl, this woolly blanket will be gifted as well as a quilt.


Ta dah!!!!!!!


I  am so pleased with this blanket I have started another one in "boy colours" in case Helen has a little boy.  I have been confined to the house for the past few days because I have a horrid cold so in between spells of  resting in bed I have hooked away, enjoying watching the stripes grow.
 
Stay tuned for another finish.......................  eventually.  There is Christmas coming up after all.
 
In the meantime I am off to sew handles onto the two patchwork bags I have made.  These have to be handed over tomorrow as I am meeting up with my sister for a present swap.  The bags are for two of her grandchildren.


Monday, 8 December 2014

Little gifts for Christmas

I have finished two little gifts for Christmas: little needlecases which have an appliqued strawberry on the front and small patchwork squares on the back.

Here they are:

 
For this one I chose a fabric with small cherries as the background for the strawberry. Added a small pair of scissors.  This is my Secret Santa gift for my patchwork group.  We are meeting again on Thursday morning and the Secret Santa will take place then.


This one has a Vintage look to it and I have added a cute owl decorated tape measure. This is for a friend and now has to be wrapped ready for posting.

I love these little needlecases which are based on a pattern by Nanacompany.  I have made several in the last couple of years and all have been well received.

I love the patchwork backs, made from 1.5" squares so good for using up tiny scraps of fabric.


So, two gifts finished but I am still trying to complete the two bags I am making. Still lots to do there!


Saturday, 29 November 2014

Hello World baby quilt finished

I have been making a baby quilt for a baby boy expected mid November.
I decided on a more modern design, using an idea my friend Sarah uses in many of her lovely baby quilts which incorporates the baby's name, appliqued at the top of the quilt.

I put the top together some weeks ago as the Mum-to-be knew she was expecting a boy.  I hand quilted the majority of the quilt using Perle cotton, leaving the top section for the name to be appliqued and the quilting and binding to be done when baby arrived.  Little rascal came a few days early but I finished the quilt quite quickly and passed it along (via another friend) yesterday.

I love the cool colours of this quilt and I think they will match baby's room décor and his Mum's style. Hope so, anyway.  As long as it is used, that's all I want.


The front:
 

A sneaky peek of the cool green and white striped backing fabric:


And a Close up of the appliqued name:


I hope baby James enjoys his quilt.  It measures 30" x 40" so it can be used in a variety of ways:
as a playmat and for 'tummy time', snuggling with Mummy or Daddy, wrapped around in his pushchair, Moses basket or car seat and, a little later on as a cot quilt.
 
Welcome to the world!

Wednesday, 26 November 2014

Seeing a Quilt Show - a bonus

We recently had a great weekend in London - a re-run of one we had to cancel when our daughter was ill and we had to man the fort.

We had visits to two exhibitions planned: The Emily Carr collection at The Dulwich Art Gallery and The Rembrandt Exhibition at The National Gallery.

On the Saturday morning we headed off to Dulwich, a surprisingly easy and pleasant tube and overground train journey.  The Exhibition of Emily Carr's work was amazing.  I knew nothing of this Canadian painter who died in 1945.  She had trekked over many areas of Canada and painted some wonderful pictures of the abandoned villages left behind by the Haida First Nation tribes when they were decimated by smallpox in the 1860s.  Such a clear record of the houses and totem poles.  Emily Carr's pictures of trees and forests are magnificent. She was obsessed by trees and would take her little painting stool off into the middle of a forest and paint what was around her.  Very striking and dramatic works.

On our way to find an Italian Restaurant that had been recommended to us, my husband spotted a flier for a Quilt Show, tied to some railings!

It was the Dulwich Quilters' Show which takes place every two years and was held in the Old Library of  Dulwich College.

Lots of quilts - the ladies are prolific -, nicely staged, lovely homemade cakes and tea or coffee on sale and some very interesting and chatty quilters who were happy to talk about their work. 

A few photos for you to enjoy too:

 
Beautiful Hand quilting on both of these quilts:


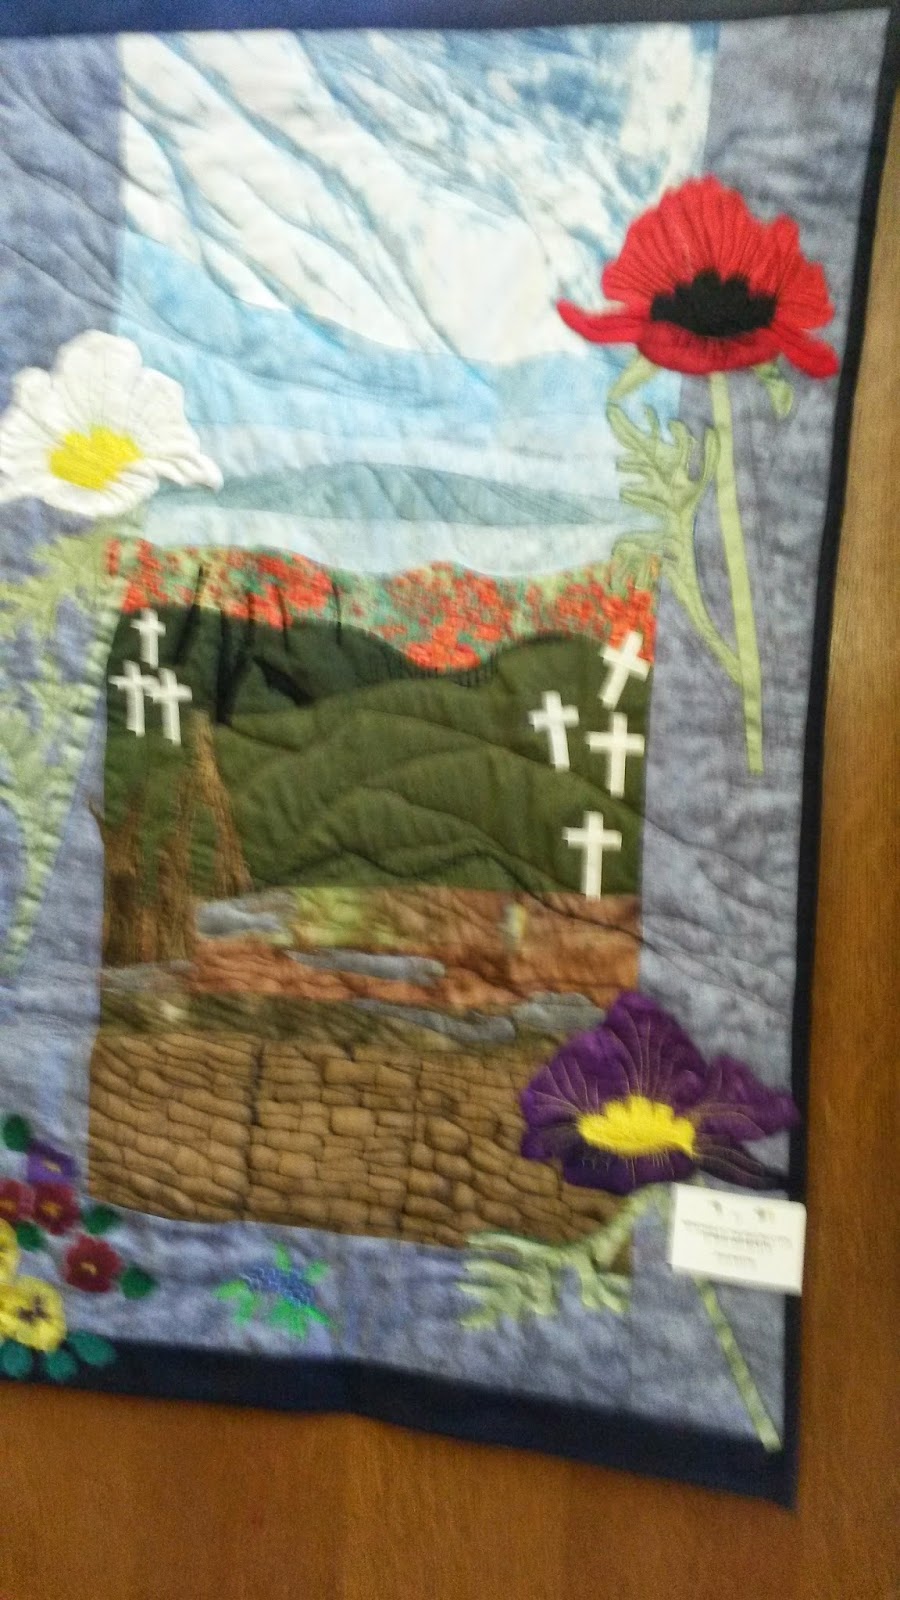
One commemorating the Centenary of the First World War:


I also enjoyed the quilting quotations dotted around the exhibition:


It was an excellent end to a great visit to Dulwich - our first time there but we hope to see other art exhibitions in the future, and perhaps the Dulwich Quilters' next show?


Friday, 14 November 2014

Using up Crumb Blocks

As an avid follower of Bonnie Hunter I am always making Crumb blocks as a leader and ender project.
I usually cut them at 4" square and collect in an old biscuit tin.  The tin was overflowing so I decided to put some together to make a quilt top, combining  ideas from Gwen Marston's book "Liberated String Quilts" and, of course, Bonnie!

A year or so ago I made a Cornerstones Quilt ( Gwen Marston' s idea) using single 4" blocks and sashing them as suggested in this pattern:


I am sure I have seen 4 small crumb blocks made into a 9 patch ( Bonnie's blog, Flickr, not sure where) so I pieced together pairs, just as they came out of the tin, no over-thinking as this is a Scrap Quilt!
 
 
Here's my string of 4" blocks sewn into pairs:
 
 
Then I snipped them into pairs of 2s, left them 'webbed' and easily put them together in a 4 patch block.  I did pin the centre but it really wasn't necessary as this webbing idea gets the blocks lined up beautifully.
 
 
Can you see the 'webbing"? It's the tiny thread holding together the pairs between the left hand side of the joined pairs.
 
 
And here they are, all sewn and pressed, a really colourful bunch:
 
 
I am now finishing the sashing of the blocks to make another Cornerstones Quilt.
 
I am using a lilac Kona cotton and a couple of scraps which tone well with the lilac to make my 'cornerstones".  I am assembling this exactly as Gwen Marston shows in her book. But as my blocks are larger I have cut the sashing and cornerstones at 3" instead of 2.5".
 
The cutting didn't take long - even cut up the remaining cornerstone fabric scrap into some 3" squares and a strip for my Scraps Stash - and then chain pieced the sashing onto the blocks.
So far I have only completed one of the cornerstone-sashed blocks but I accomplished so much in a short time yesterday.
 
This is where I got to:


And that's where it stays at present.  I'm off to London with my husband for the weekend, setting off for the train station quite soon. We are going to a couple of exhibitions at the National Gallery and the Dulwich Gallery, plus a bit of shopping and sitting and reading in book shops!  Loads of walking of course, catching lots of tube trains where you walk miles along underground tunnels so my Fitbit will be working overtime.  I'm hoping to get some amazing totals on my weekly report next Tuesday!

Happy sewing!


Tuesday, 11 November 2014

Christening Gifts

Just finished two patchwork totes to hold the books of Bible stories I am giving as Christening presents to our neighbours' baby granddaughters, cousins Freya and Eadie who were born only a month apart.


And with the books that will be popped inside the bags:
 
 
When I bought the two books I wanted to get a different one for each baby, I didn't think about their dimensions being slightly different.  The blue book wouldn't fit into the same sized tote as the other book, so I had to make Freya's bag larger.  Hope their Mums don't think that's odd!
 
The photos were taken on a dismal grey day and the colours of the patchwork are not as bright as they are in real life.  However, they are ready for the Christening at the end of the month.
 

Saturday, 8 November 2014

At last, I've made some Wonky Wishes blocks

Earlier in the year I made a few Wonky Wishes blocks as QAYG blocks for the Soy Amado Project.
I had seen them originally on Bonnie Hunter's blog (her pattern) and had watched her making them on one of her QuiltCams.

They really sang to me, hence the QAYG versions for Alison's project.

Since then I have been adding to my stash of 2.5" squares although I regularly deplete them by making patchwork totes for little girls!

Finally, yesterday I put a few Wonky Wishes blocks together.  They are intended for a 'boy' quilt, so I eliminated any 2.5" squares which included pink or mauve/purple. That immediately made a dent in the stash which says a lot about the colours I favour!

I love using scraps and find Bonnie's ideas so stimulating. Of course I also love stars!  I thought I had quite a mix of fabrics but found that really wasn't the case and struggled to get enough contrast and variety in the blocks.  So far I have completed these:


As long as you have a large supply of 2.5" squares, including a pile of neutrals for the centres and loads of small neutral scraps you an make these blocks very quickly, in a chain pattern, revolving two blocks at a time as Bonnie suggests.  I also used her 'webbing idea' which was new to me but easy to do, efficient to make as it eliminates the need to pin the rows together.

I took some photos of a block to show the method:

1.  All three rows "webbed"


2. Rows 1 & 2 sewn together:


Each of these blocks is actually a quarter of the finished block as you put 4 together to make a Wonky Wishes  block measuring 12.5" so I have a lot more to make. However this is an on-going project so when I run out of interesting and varied 2.5" squares I'll put it aside for a while until I build up my stash again.  Good fun though. I can recommend the block and the method Bonnie shows on her blog.  It's under her "Free patterns" tab.

As I said I cut, stash and use 2.5" scrap squares all the time and my stash is taking a hammering at present!

My lovely little granddaughter is forever at birthday parties so I suggested to my daughter that I could make patchwork totes for gifts, with the birthday girl's name appliqued on the front ( as long as the name was 4 or 5 letters long).  So I have made quite a few! 
The latest is for Emily - birthday coming up soon I believe:


The back:


Having a variety of squares already cut makes these projects so quick to make.

So another happy time sewing and a few more scraps used up!  I so enjoy using every last bit of fabric!


Wednesday, 22 October 2014

Operation Christmas Child 2014

Just wrapped my Samaritan's Purse Operation Christmas Child Shoebox in Christmas paper. 
Quite a fiddly job but it looks alright - I think!

Always amazed how many small gifts I can squeeze into a shoebox. 
Totals 21 this year:

Little teddy and his quilt
Patchwork tote bag
Toothbrush and toothpaste
Pencil case & pack of pencil crayons, sharpener, set of erasers shaped like animals, mini gel pens
Box of chubby wax crayons
Pad of coloured drawing paper
Pretty tin with soap inside
Knitted scarf & beanie set
Lollipop
2 packets of sweets
Soft Mini Mouse ball
Pack of 3 fancy  hair  bobbles


So, all ready to be packed back into the shoebox. I know they will all fit inside as I did a trial pack before I covered the box.
 
I have aimed my box at a little 2-4 year old girl so I hope it brings some Christmas joy to whoever gets my gift.  It is sent with love. 

Friday, 17 October 2014

Recycling

I am very into recycling. I have never been comfortable with throwing anything away, probably because I was born a couple of years after the end of WWII. No one threw anything away, food scraps, veggie peelings etc were fed to the chickens, anything extra was exchanged with neighbours
(we had chickens and Dad swapped eggs with honey from bee keeping neighbours and sugar ration coupons with another neighbour who didn't have a sweet tooth). Sheets were sewn sides to middle when they were worn, worn out towels etc were used as floor cloths, our white summer shoes were used as sandals the following year when our feet had grown as Dad cut the toes out of the shoes and we had peep toe shoes instead!

I recycle as much as ever I can, using the various recycling containers our council supplies us with: for glass bottles and jars, tins and foil, most plastics ( not black), newspapers and magazines, envelopes, scrap paper, plastic containers, margarine, cream and yogurt pots, and cardboard.  Plastic carrier bags, plastic wrappings from bread or magazines are taken to the local supermarket bin. I re-use plastic carrier bags whenever I can or use cloth bags, some I have sewn myself from old fabric.

I try to take it a little further. If I can't re-use glass jars I pass them on to neighbours who can use them; I keep some margarine cartons to use for left overs in the fridge and freezer; shred any personal papers and add to the newspaper recycling; use torn up scraps of paper for grocery lists/ phone messages. I re-use wrapping paper and gift bags and cut up old greetings cards into postcard style notelets and gift tags.

I try never to throw food away. So I plan what we are going to eat a few days at a time and only buy food for those few days. If I suddenly find I have some veggies hanging around in the fridge I make a veggie based meal - soup, stir fry etc. Peelings and food scraps go into our garden recycling bin(allowed in our area). If I am making a rice or pasta dish I always cook more than we need for that meal and the remainder makes lunch for the next day or I add extra ingredients and turn it into another meal the next evening.


I use old T shirts, towels etc for cleaning rags and try to use paper towels and one-off products as little as possible.

And of course I follow the same principle in my Quilting Life, using scraps all the time and never throwing a tiny scrap away if it can be used in my projects.

I would love to hear how you approach recycling, both in everyday living and in your crafting hobbies.

Rainbow Single quilt, finished

I have been having a very busy and productive time sewing and have managed to finish several projects in the last few days.

My latest finish is a large quilt based on Emily Cier's  pattern in her Scrap Republic book.

The quilt design is called Beeline and the pattern is for a baby quilt.  I made a baby sized one last year but decided I had more than enough fabrics to enlarge it to a generous single bed size. 
The finished quilt measures 88" x 54".

I started the quilt back in February when we were in New Zealand and I managed to complete the top by the time we came home at the end of March.  I used lots of rainbow coloured scraps from my NZ stash but took out a few more and many of the neutral fabric scraps I needed for the borders.
Whilst I was there I managed to find a suitable fabric for the backing and, even better, it was on sale at a good price.

So, on and off over the past months I have hand quilted it with Perle cottons. I used cream for the borders and coloured Perles to match the colour of the rainbow stripe.

I love rainbows and this year we have seen lots, both here and in NZ so I have decided to call the quilt Remembering Rainbows.


Showing the backing:


I am giving it to a friend's 5 year old daughter, just in time for the winter.  It is a surprise and I shall be handing it over on Monday. Hope she likes it!


All rolled up, ready to gift.


Wednesday, 15 October 2014

Two little totes - all finished

I wanted to make one more gift to pop into my Operation Christmas Child shoebox - a little patchwork tote.  At the same time I made another similar tote for my little granddaughter to give as a birthday party gift for her school friend Niamh.

For both bags I used 2.5" squares from my stash and laid them out in 5 rows of 4 squares.

I lined both with the same pale pastels striped fabric and used a bright pink with turquoise dots for the handles.  Both bags had squares of both fabrics in them so it did match up.
The bags finish at 7.5" x 9.5".  I appliqued Niamh's name on the front of her bag.

Here they are:


I hope both little girls will enjoy carrying their treasures around in them.
 
It is so useful having a stash of squares on hand - an idea I got from Bonnie Hunter's blog. 
Whenever I finish a project or I am just left with a small piece of fabric after I have been cutting out I cut it into useful sizes for my scraps stash:
 
These are the sizes I always cut scraps into:
 
SQUARES:

2", 2.5", 3", 4.5"
 
STRIPS:
1.25", 1.5", 2", 2.5"
 
Small scraps are put into my Crumb blocks tin.
 
Uneven shaped strips are kept in a bag ready to be used in Strip quilts.
 
So you see, nothing is wasted!

Tuesday, 14 October 2014

A finished baby quilt

I know of three babies due to be born from November to January next year so I am trying to build my stash of baby quilts.  I have a few baby girl ones but no boy quilts.

When I was in New Zealand earlier in the year I was given a patchwork magazine from 2007 which included a pattern for a baby quilt.  It was by Ruth Buchanan and the quilt was called Fairy Lights.

I loved the pattern as it showcased a pretty fabric and was surrounded by HSTs which I always enjoy making.


The Pattern:
 
 
About two years ago my Patchwork Group went on an outing to a favourite Quilt Shop, The Bramble Patch in Weedon, Northamptonshire.  I bought a lovely selection of fabrics and some yellow Fat Quarters which I thought went with the fabrics I had chosen.  The quilt I had in mind didn't materialise so the bag of fabrics languished in my sewing cupboard.
 
Fast forward to a month or so ago when I was thinking of ideas for Boy Quilts and I suddenly remembered my stash of yellow, grey and blue fabrics. Perfect for a boy and perfect for the Fairy Lights pattern as I wanted to showcase the gorgeous elephants (I love elephants!), trains, cars and rows of fairy mushrooms.
 
I set to, made all the blocks without difficulty and then laid them out in a pleasing order.  That was when I discovered my mistake.  The fabric Ruth Buchanan had used was a non-directional design.  All my blocks had directional patterns!  Oh dear!  I put my thinking cap on and realised I would have to add extra strips of HSTs to the fourth side of each block.  more sewing but I am happy with the result.  I didn't have to buy any more fabric as I had enough in my stash for the extra HSTs and the border and backing fabrics were ones I had bought at the Festival Of Quilts back in August.
 
As I had added extra strips my quilt came out at 42" square, a bit larger than the pattern.  I think this is a useful size - big enough to wrap baby in, use on the Moses basket or later on the cot and is a great size for a playmat.


As the pattern was so busy I decided to machine quilt in the ditch.  Although I have been quilting since 1997 this is only the third quilt I have machine quilted.  It's not perfect but it's not too bad either. I'm happy with it anyway!
 
And here it is - my Boy Version of the Fairy Lights quilt:


And a glimpse of the backing:


Now I have to think of a name for the quilt.  I don't think Fairy Lights is quite right for this quilt!

Any suggestions will be very welcome.  No idea springs to mind at present.

I have already used the scraps of elephants, cars and mushrooms fabrics in another boy quilt top - strips this time.  It is now ready for sandwiching and I am going to hand quilt this one.   It will be my handwork project to take to my Patchwork Group.

Off to sandwich the quilt top.  Not my favourite part of making a quilt as it involves me crawling around on the floor in my Sewing Room!
 

Tuesday, 7 October 2014

Little quilt for teddy

Just finished a dear little quilt to cover the little teddy which will be going into my
Operation Christmas Child shoebox.


It measures 10" square, just the right size to cover this sweet little bear.


I think teddy likes his little quilt.  Can you see him smiling?
 
I have one more little patchwork item to make for the shoebox ( a little tote bag) and then I'm done. 
The shoebox has to be covered with Christmas paper  - a job I always find to be quite fiddly.

Monday, 6 October 2014

3 Beanies

Around this time of year people in my Church are busy putting together Christmas paper-covered shoeboxes for Samaritan's Purse Operation Christmas Child.  This is such a wonderful project - the shoeboxes are filled with all manner of small gifts ( knitted hats, scarves, small soft toy, hair slides, balls, toothbrush, toothpaste, soap, sweets, stationery items etc) and then sent overseas to many countries in Eastern Europe, Africa  and so on which are then handed out to children to enjoy at Christmas.  A simple idea, it's amazing how many different gifts you can squeeze into one shoebox. You decide whether the gift is for a boy or girl and the age range it suits best.

There is a table at Church where you can put extra gifts ( other folk take one to add to their box, leaving a small donation which goes towards shipping costs) . Sometimes people don't feel able to fill a whole box so contribute a few items that others can use. Every little helps.  Last year my Church was able to send 250 filled shoeboxes, so we hope for even more this year.  They will be collected at a Dedication Service at the beginning of November so time is rushing by to finish making gifts.

I have been busy making and buying little gifts for my box which is aimed at a 2-4 year old girl.  The Beanie hats are so quick and easy to make I made 4, one to put in my own shoebox and 3 for others to use.


The Beanies
 
 
I didn't do a shoebox last year but did two years ago.  I will post a photo of the finished box - not quite yet as I am making two items to add to it, then it will be done.

I'm also busy with my quilting so lots in production here!

Sunday, 21 September 2014

Calling all Scrap quilt lovers


If you read my blog you will know that I love Scrap Quilts: making them, gazing at pictures of them, looking at them in shows! I have quite a collection of Scrap Quilt books on my sewing room bookshelves and loads of patterns  in my ring binder file.

So I was delighted to find Deb from Works in Progress is not only making a Scrap Quilt ( Katie Jones Scrap Vomit one) but is encouraging quilters to make a scrap quilt or finish one they have already started. No doubt there are hundreds of UFOs hidden away in cupboards all over the world!

Here's the link: #scrappyquilt#quiltalong

Have a look and get inspired and don't forget to add your quilt or block pictures to Deb's link.

I love Deb's quilts. She has a great eye for colour and design and all her work is so cheerful - I find myself smiling when I see her quilts.

So, this has spurred me on to start making some blocks for a Wonky Wishes quilt, a free pattern by Bonnie Hunter on her Quiltville blog.  Earlier this year I make four of these blocks which I  did QAYG style for the Soy Amado project.  I loved making them and was very pleased with the result  and would love to make a whole quilt. I have a lot of 2.5" squares already cut but I will need to cut a lot of neutrals for the star centres.  So this week I  intend to look though my stash for neutral scraps and cut out as many 2.5" squares as I can and put some scraps to be used for the star points into a ziplock bag so I have everything ready to make the blocks. My intention is to make it alongside another baby quilt I hope to start very soon.


 I am hoping that by writing a post about my intentions I  will actually start to do it.

Happy Scrappy Sewing to you all!


#scrappyquilt#quiltalong

Wednesday, 17 September 2014

My Giveaway Win

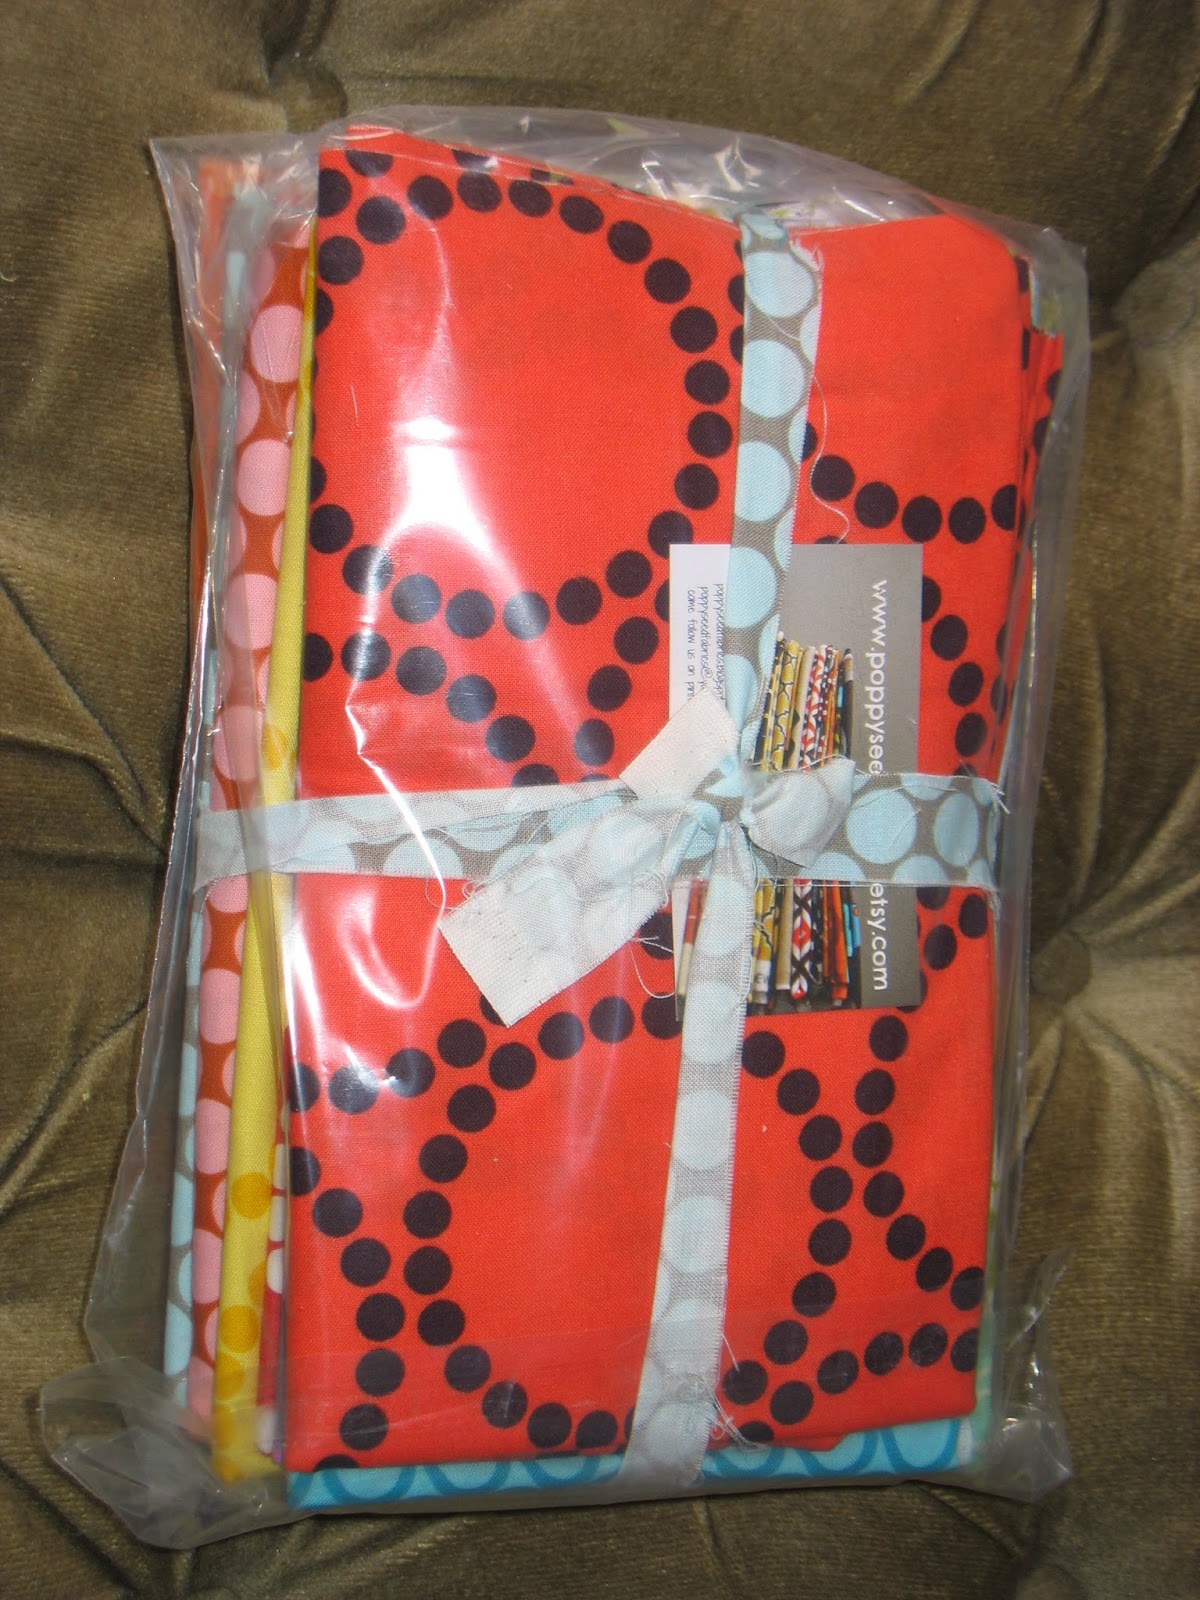
About a month ago I was amazed to learn from Rita of Red Pepper Quilts that I had won one of her Giveaways!.  I nearly always enter the Giveaways Rita hosts as they are always fabulous - either bundles of very desirable fabrics or vouchers. I was fortunate enough to win a $50 US voucher from Poppyseeds Fabrics.

I then spent a happy time trawling through lists of fabrics and trying to maximize the amount of fabric I could buy for $50.  I was paying for the postage from the USA to the UK so wanted to buy fabric that would completely fill the mail envelope.  It took a few emails back and forth because several times other customers had chosen the fabrics I had requested and I had to choose again.  However I spent my money, adding just a little bit extra of my own and then waited for the parcel to arrive.  It came really quickly - mailed last Friday and received yesterday, Tuesday.

And here it is:


And these are the fabrics I chose:

 
Several Pearl Bracelets and also a selection of Amy Butler fabrics. Aren't they gorgeous?
 
I have admired Pearl Bracelets for so long on so many Flickr and Pintrest photos but never owned any until yesterday.  I am a fan of Amy Butler designs and have bought and used several of her designs, including the Full Moon Polka Dots one in Caramel which I chose for my bundle.  It's quite an unusual colour but works well with the variety of pink fabrics I have paired it with in the past.
 
I made a baby quilt I called Emerging Butterflies.
Here the caramel fabric makes a striking border:


I made a pieced backing for this quilt and used a large piece of the Caramel Polka Dots down the centre and also for the binding.  I love a spotty binding - a tip I picked up several years ago reading Rita's blog!

The backing and binding:


I am delighted to have another yard of this useful and pretty fabric in my stash.
 
So, thank you Rita and Kimberley for this great Giveaway.  I will enjoy adding the fabrics to my stash and using them all in the months to come.

Tuesday, 2 September 2014

Sewing down Memory Lane

Not sure where the summer has gone, I certainly haven't done much sewing although I have enjoyed the sunny weather and the garden.  I have also spent a lot of time with the family, especially my four year old granddaughter.

So, now it is September, the schools start again this week and our little girl starts school!  She will be attending the same one her Mummy went to and where I taught for the last 9 years of my career.  So lots of happy memories!

More memories as I have been sewing name tapes on her school uniform and I also made her a Patchwork PE bag.  When her Mummy started school I made her a drawstring bag too although it was very basic ( I didn't really sew then, had not discovered my obsession called "Patchwork and Quilting" and certainly didn't know how to create a proper fully lined drawstring bag with a casing!). I am very pleased with the resulting bag and hope the family is too when I pop round this afternoon with it.

Ta da!!!

 
And now, a photo of the undrawn one to show off the patchwork and appliqued name!


I had to include a square of Peter Rabbit fabric as Annalise adores him.  She spends many happy hours pretending to be him and inventing various escapades where Grandpa chases her round the garden as either Mr Fox or Mr McGregor!  I am wondering how many milliseconds it will be before she spots him on the bag!

She also likes butterflies and owls so they are included too.

Back in June I made a baby quilt as a commission for a neighbour to give as a gift to a baby girl who was born on 22nd June.  My neighbour wanted to hand the quilt over in person and the first opportunity was last week.  Apparently the parents were thrilled and didn't stop "oohing and aahing" for ages!  Just the sort of response one hopes for!  I have been promised a photo of baby lying on the quilt in clothes matching the quilt colours.  I chose the colours because I thought they were feminine and pretty but didn't realise the baby already owned clothes in the same colourway! Serendipity!


This the quilt:


I have almost completed another baby quilt top.  This time for a boy (in case one of the three expected babies I know about is a boy).  Just have the two borders to cut and sew on, then I shall be ready to sandwich and quilt it.  Now I have discovered machine quilting I think this may very well be a machine quilted one. There are a lot of small HSTs  which surround the blocks so I think quilting in the ditch may be the answer.  Stay tuned!

Happy September Sewing!